TABLE OF CONTENTS
- 1. Introduction
- 2. Create a Custom Button and Assign it to a Role
- 3. Custom Button Types
- 4. URL and Command Line Parameters
- 5. Examples
- 6. Import and Export
- 7. Custom Button Library
1. Introduction
Custom Buttons let admin users create one-click actions on the Home screen, such as running PowerShell scripts or executables on client machines, the current console device, or the core server. Visibility is controlled via the Roles & Rights & Token system, so only users with the required role can access a button. Supported types include Executable, PowerShell, URL and LPM and each Custom Button’s appearance can be customized to suit individual preferences. PowerShell buttons can provide persisted feedback through the five(9)s Notification system, as well as to the logged on user of the target machine. Custom Buttons can also be integrated into the client history log.
2. Create a Custom Button and Assign it to a Role
To create a new Custom Button, go to the Admin > General Settings > Add Custom Button.

Fill in the desired fields and click Save. (For a detailed explanation of possible Custom Button configurations, refer to the next chapter).

Now you need to go to Admin > Roles & Rights & Tokens and click on the edit icon of the targeted role.

Select the newly created Custom Button under Allowed Custom Buttons and save.

Now you can see and use the button on your home screen.
3. Custom Button Types
This chapter introduces the four Custom Button types: Executable, PowerShell, URL, and LPM.
All types share common features, such as a name, a customizable appearance, and the option to display a confirmation dialog in the five(9)s Console when clicked. Some can use parameters, which are described in the next chapter 3. Url and Command Line Parameters.
3.1 Type: Executable
Custom Buttons of type Executable allow you to launch applications with a wide range of parameters and configurations. You must choose the execution location, which determines under which account and on which device the executable runs.
Execution Locations
Core – Runs on the EPM Core server using the Console Service Account.
ConsoleDevice – Runs on the console user’s device under the Ivanti Service Account.
ConsoleDeviceAsLoggedOnUser – Executes on the console user’s device as the currently logged-on user. (Tip: Useful for updating user-specific settings, like HKCU registry keys or files in the user profile.)
SelectedDevice – Runs on the chosen device under the local system account.
SelectedDeviceAsLoggedOnUser – Executes on the chosen device as the currently logged-on user. (Tip: Ideal for live-updating user-specific settings, such as HKCU registry keys or profile files.)
Prerequisites

For all executable locations except Core:
The target device must have an Ivanti EPM Agent installed.

For the executable locations ConsoleDevice and ConsoleDeviceAsLoggedOnUser:
The console user’s device must have the Ivanti EPM Agent installed for the current EPM Server.
Executable to start
In the field "Executable with path" you have to enter the full local path of the executable to start.
e.g. C:\Windows\System32\cleanmgr.exe
Command Line Parameter
e.g.: /verylowdisk
For available parameters consult the parameter section in this document.
Starting of Batch or Power-Shell
Batch
To start .cmd or .bat file you need to call the command line interpreter
C:\Windows\System32\cmd.exe
as an executable and pass the command line like this:
/c "C:\temp\sample.bat"
Exit command required
If you use .CMD or .BAT files as executables, please ensure your script includes the "Exit"  command to quit.
3.2 Type: PowerShell
When you select the type "PowerShell" you have to decide where the script should be started.
You can select the following target location:
Target Locations
Core – Runs on the EPM Core server using the Console Service Account.
ConsoleDevice – Runs on the console user’s device under the Ivanti Service Account.
ConsoleDeviceAsLoggedOnUser – Executes on the console user’s device as the currently logged-on user. (Tip: Useful for updating user-specific settings, like HKCU registry keys or files in the user profile.)
SelectedDevice – Runs on the chosen device under the local system account.
SelectedDeviceAsLoggedOnUser – Executes on the chosen device as the currently logged-on user. (Tip: Ideal for live-updating user-specific settings, such as HKCU registry keys or profile files.)
Prerequisite

For all target locations besides the Core:

The target device needs to have an Ivanti EPM Agent installed.

For target locations "ConsoleDevice" and "ConsoleDeviceAsLoggedOnUser", the console user's device must have the Ivanti EPM Agent for the current EPM Server installed.

The PowerShell executable must be available on the target device.
C:\Windows\System32\WindowsPowerShell\v1.0\powershell.exe
You can enter the script that will be executed on the target device in the Powershell Content editor.
You can use parameters like %Hostname% (see available Parameters) for your script and they will be replaced before the script is executed at the destination.

For the feedback to the five(9)s Console:
- PostMessageInfo $message
- PostMessageWarning $message
- PostMessageError $message
- PostMessageCopy $message
For the feedback to the user, that is currently logged onto the target machine:
- ShowMessageInfo $title $message
- ShowMessageWarning $title $message
- ShowMessageError $title $message
Example:
If you use
$message = 'This is a test message.'
PostMessageInfo $message

$message = 'This is a test message to the user.'
$title = 'Hello User!'
ShowMessageInfo $title $message

Error Handling
A feedback is send if the script fails. Further troubleshooting information can be found in the Windows Temp folder. For example:
C:\Windows\Temp\be305476-8f37-49b6-877e-8f072d61fcb3.ps1.log
Remarks
The PowerShell script is run as 32-bit, which should be sufficient for most use cases.
This prevents 64-bit programs to be executed in the script.
In rare cases it can be necessary to call a 64-bit program, but this can be achieved by adding code to the PowerShell script.
$arguments = "-NoProfile -ExecutionPolicy ByPass -WindowStyle Hidden -File `"" + $myinvocation.mycommand.definition + "`""
        $path = (Join-Path $Env:SystemRoot -ChildPath "\sysnative\WindowsPowerShell\v1.0\powershell.exe")
        Start-Process $path -ArgumentList $arguments -wait
3.3 Type: LPM - Ivanti Process Manager
You can download the XML signature to import it into the Process Manager.
Prerequisite
The console must have a properly configured connection to the Process Manager under:
Admin | Processes | Process Manager Details
3.4 Type: URL
With a Custom Button of type URL you can open URLs and pass parameters from the selected device or the user.
Target Options
Blank: Opens the URL in a new browser tab.
Frame: Opens the URL inside a console frame, keeping it as a subpage. Note: Some sites block framing (X-Frame-Options).
Self: Redirects to the URL in the current window.
Please note
Some websites deny showing their content in frames (X-Frame-Options).Type your URL including the parameters you like to use.
For available parameters consult the parameter section in this document.
E.g. if you like to find details about the city the user of a selected device lives in, open Google.com and pass the device owners city attribute.
http://www.google.com/search?q=%OwnerCity%
(AD import with LDDA might be required for the attribute "OwnerCity")
4. URL and Command Line Parameters
- %Hostname% Hostname of the selected computer
- %IDN% Computer_IDN of the selected computer
- %SerialNum% Serial number of the selected computer
- %MAC% Mac address of the selected computer
- %LoginName% Last login name of the selected computer
- %PrimaryOwner% Primary owner of the selected computer
- %FQDN% Fully qualified domain name of the selected computer
- %IP% IP of the selected computer
- %ComputerLocation% Location of the selected computer in a directory service
- %OwnerAddress% Street of the primary user of the selected computer *
- %OwnerCity% City of the primary user of the selected computer *
- %OwnerZip% ZIP code of the primary user of the selected computer *
- %AdminIP% IP Address of the Console user - pushing the button
- %AdminMail% Email Address of the Console user - pushing the button
- %AdminUserName% Username of the Console user - pushing the button
- %AdminTimezoneUtcOffset% UTC offset of selected user-timezone
- %LogonServer% Logon server of the selected computer e.g. \\servername
- %DeviceID% Device ID (the GUID) of the selected computer - unique identifier
As well as all "Custom Inventory" properties. E.g. %CustomerID%
* AD import with LDDA might be required
You can check the available paremeters directly in the console, using the collapsible when you edit or create a Custom Button.

5. Examples
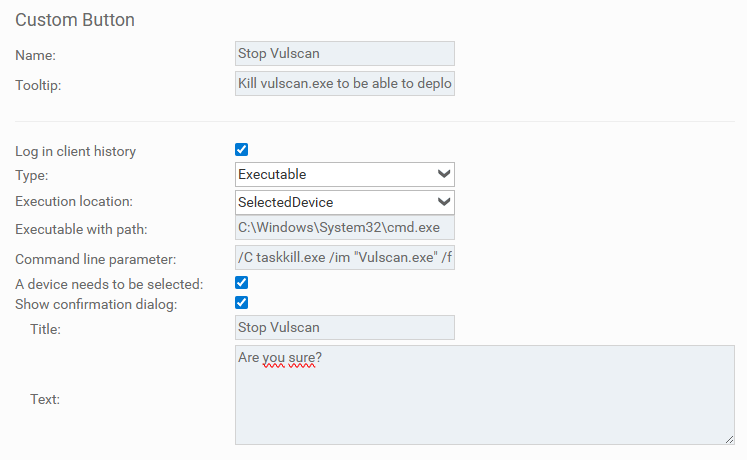
5.1 Example: Executable
This sample stops the Vulcan.exe on the selected device to enable a push software deployment in case a security scan takes to long to complete.
5.2 Example: Batch

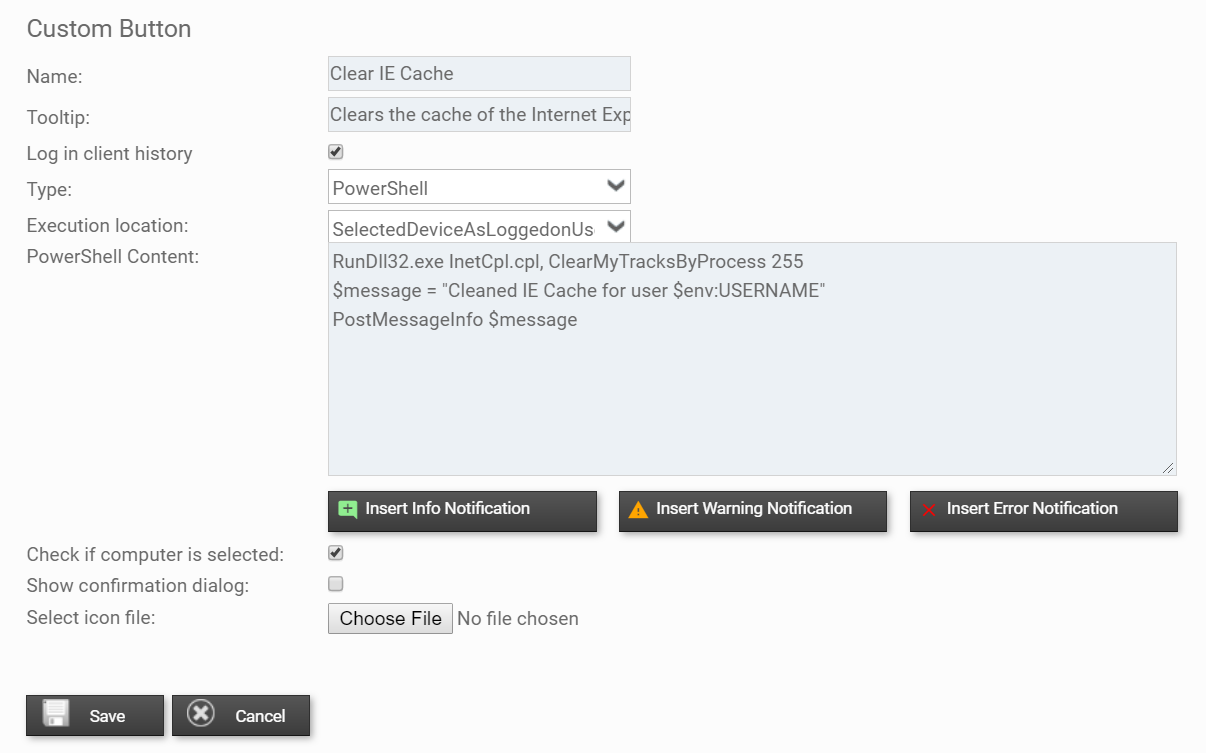
5.3 Example: PowerShell
6. Import and Export
It's possible to import and export one or more Custom Buttons, so that they can be shared among multiple instances and different customers. They are exported into a simple JSON structure and the Import uses the same structure as the Export. It's possible to choose which Custom Buttons to Import or Export, so that no buttons will be overwritten or shared accidentally.

7. Custom Button Library
Some custom buttons are a built-in part of the five(9)s Console. They are premade and can be accessed using the Add premade Custom Button button.

You can add a button and customize it aftwerwards if needed.

Tags
- Custom Buttons
Disclaimer
Was this article helpful?
That’s Great!
Thank you for your feedback
Sorry! We couldn't be helpful
Thank you for your feedback
Feedback sent
We appreciate your effort and will try to fix the article