TABLE OF CONTENTS
- 1. five(9)s Console Installation
- 2. five(9)s Console Configuration
- 3. Adjusting Settings in the IVANTI Endpoint Manager Console
- 4. Accessing the five(9)s Console
- 5. Adding Users to the five(9)s Console
- 5. Manage your Operating Systems
- 6. Configure Software Packages for Distribution
- 7. Access five(9)s Console using HTTPS
- 8. FAQ
This document guides you through the necessary steps for installing and configuring the five(9)s Console. If you have any questions, please contact us at support@five9s.de. We will be happy to help you.
Important Note
Prerequisites
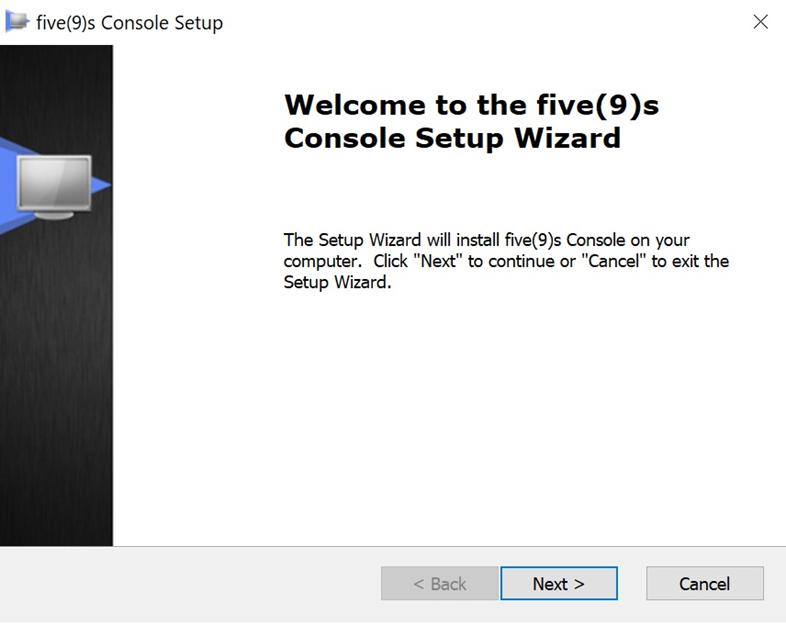
1. five(9)s Console Installation
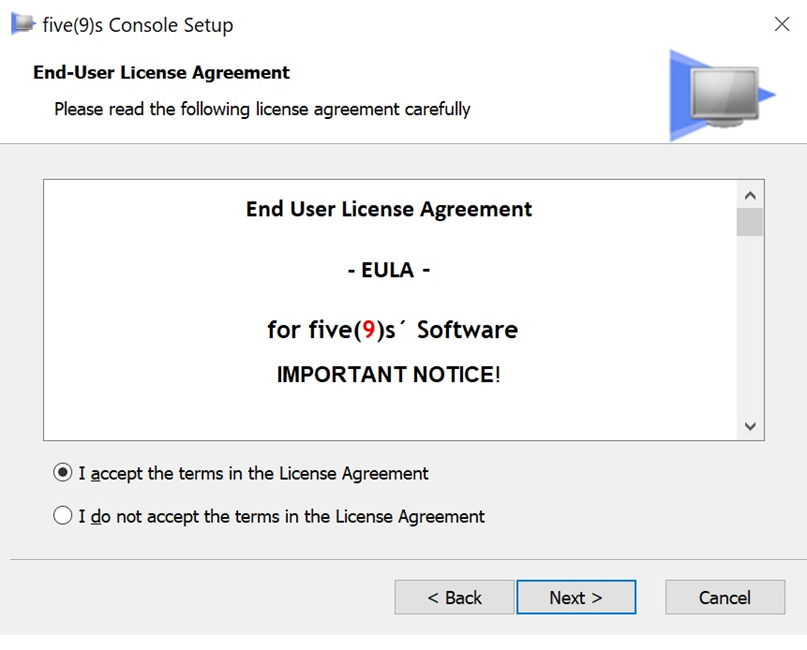
Accept the EULA and click "Next" to proceed.
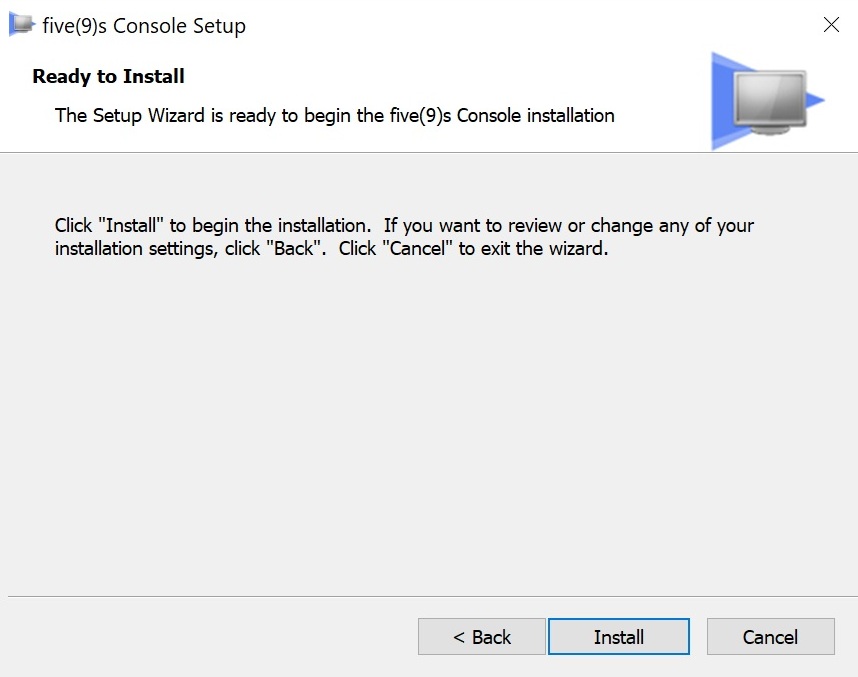
Proceed with "Install" and start the installation.
The executable will place a shortcut on your desktop.
When the installer has completed its work, you will see the following screen:
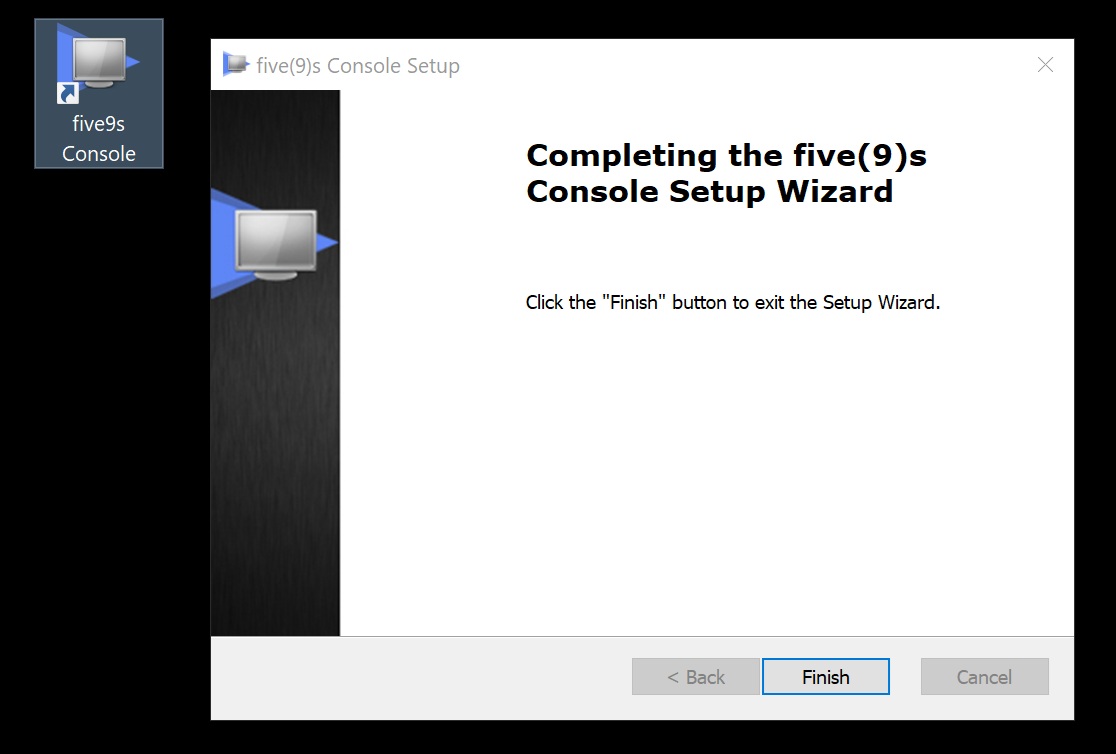
Click 'Finish' to complete the installation and to close the installer.
2. five(9)s Console Configuration
To open the five(9)s Console, double-click the five(9)s Console shortcut that was copied to the Core’s desktop during installation.
The first time you start the console, the First Run Wizard will guide you through the initial configuration steps. Several log files are retained in case something goes wrong during configuration (e. g. due to unmet prerequisites or invalid input data). You can find them on your Core server in the C:\inetpub\wwwroot\five9sWS\logs directory.
Step 1: Activate the five(9)s Console Installation

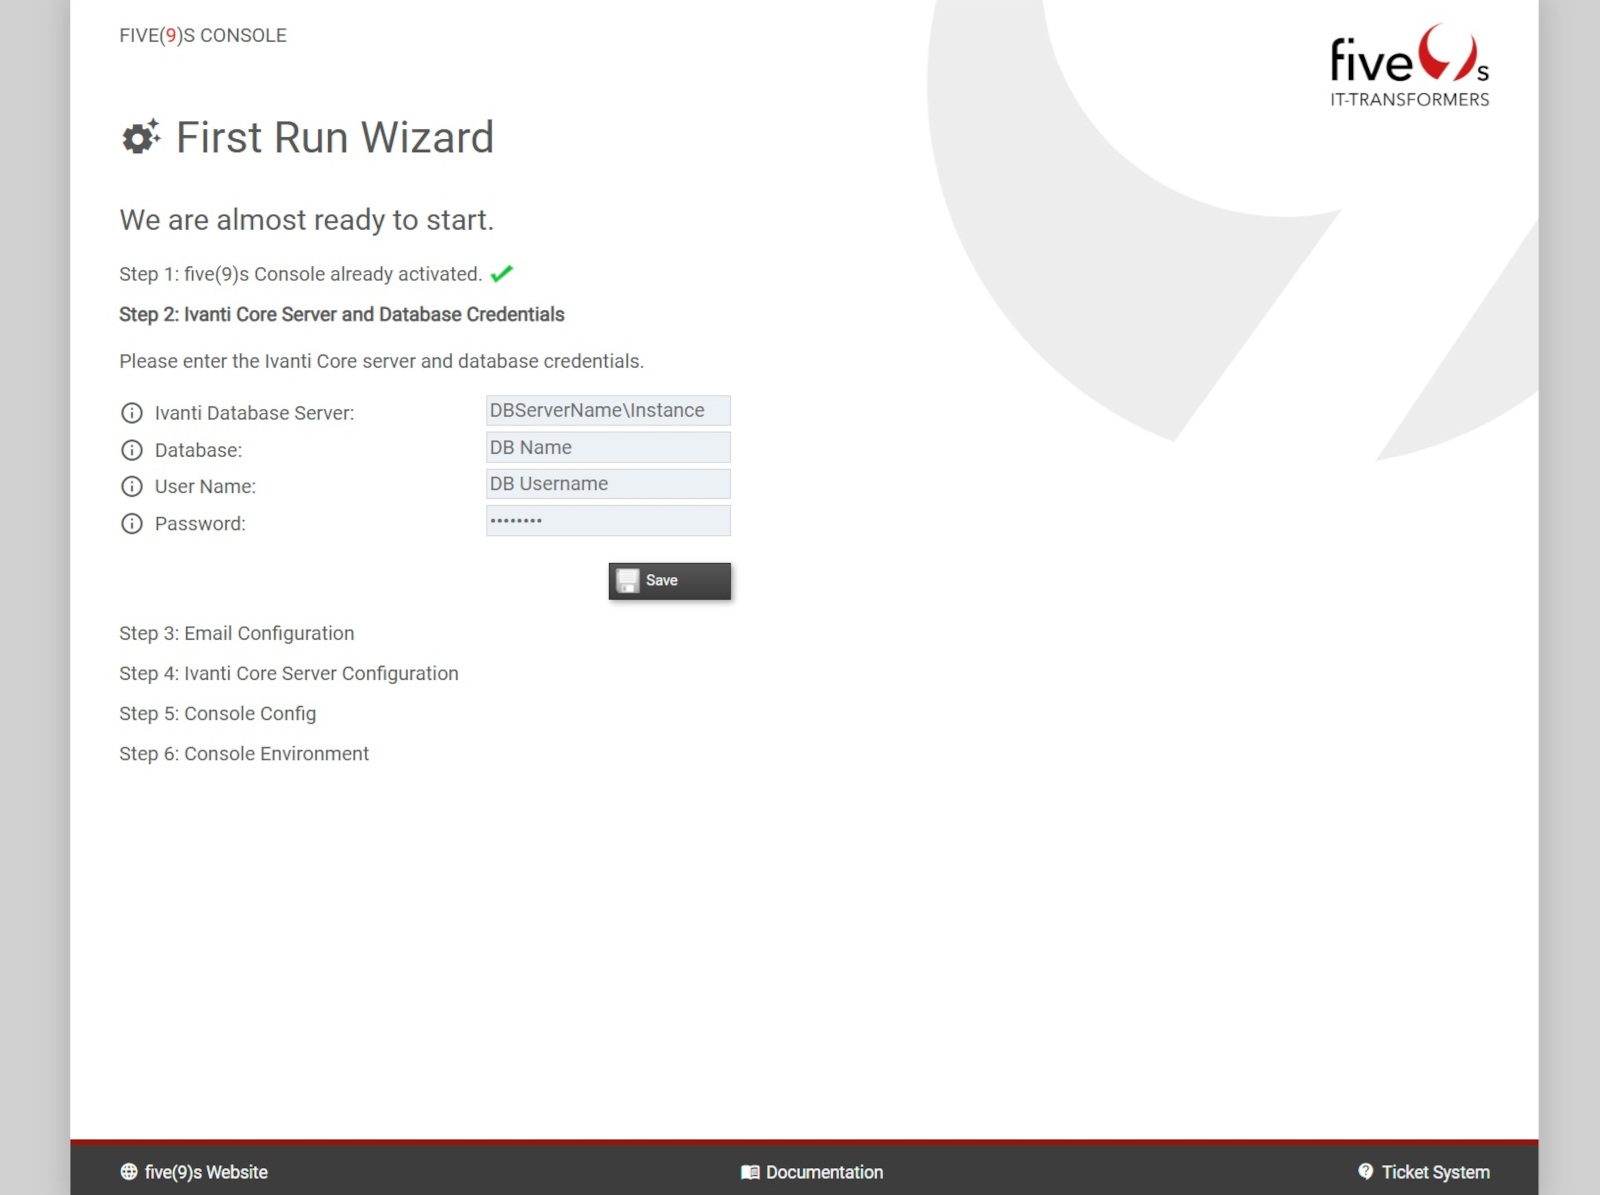
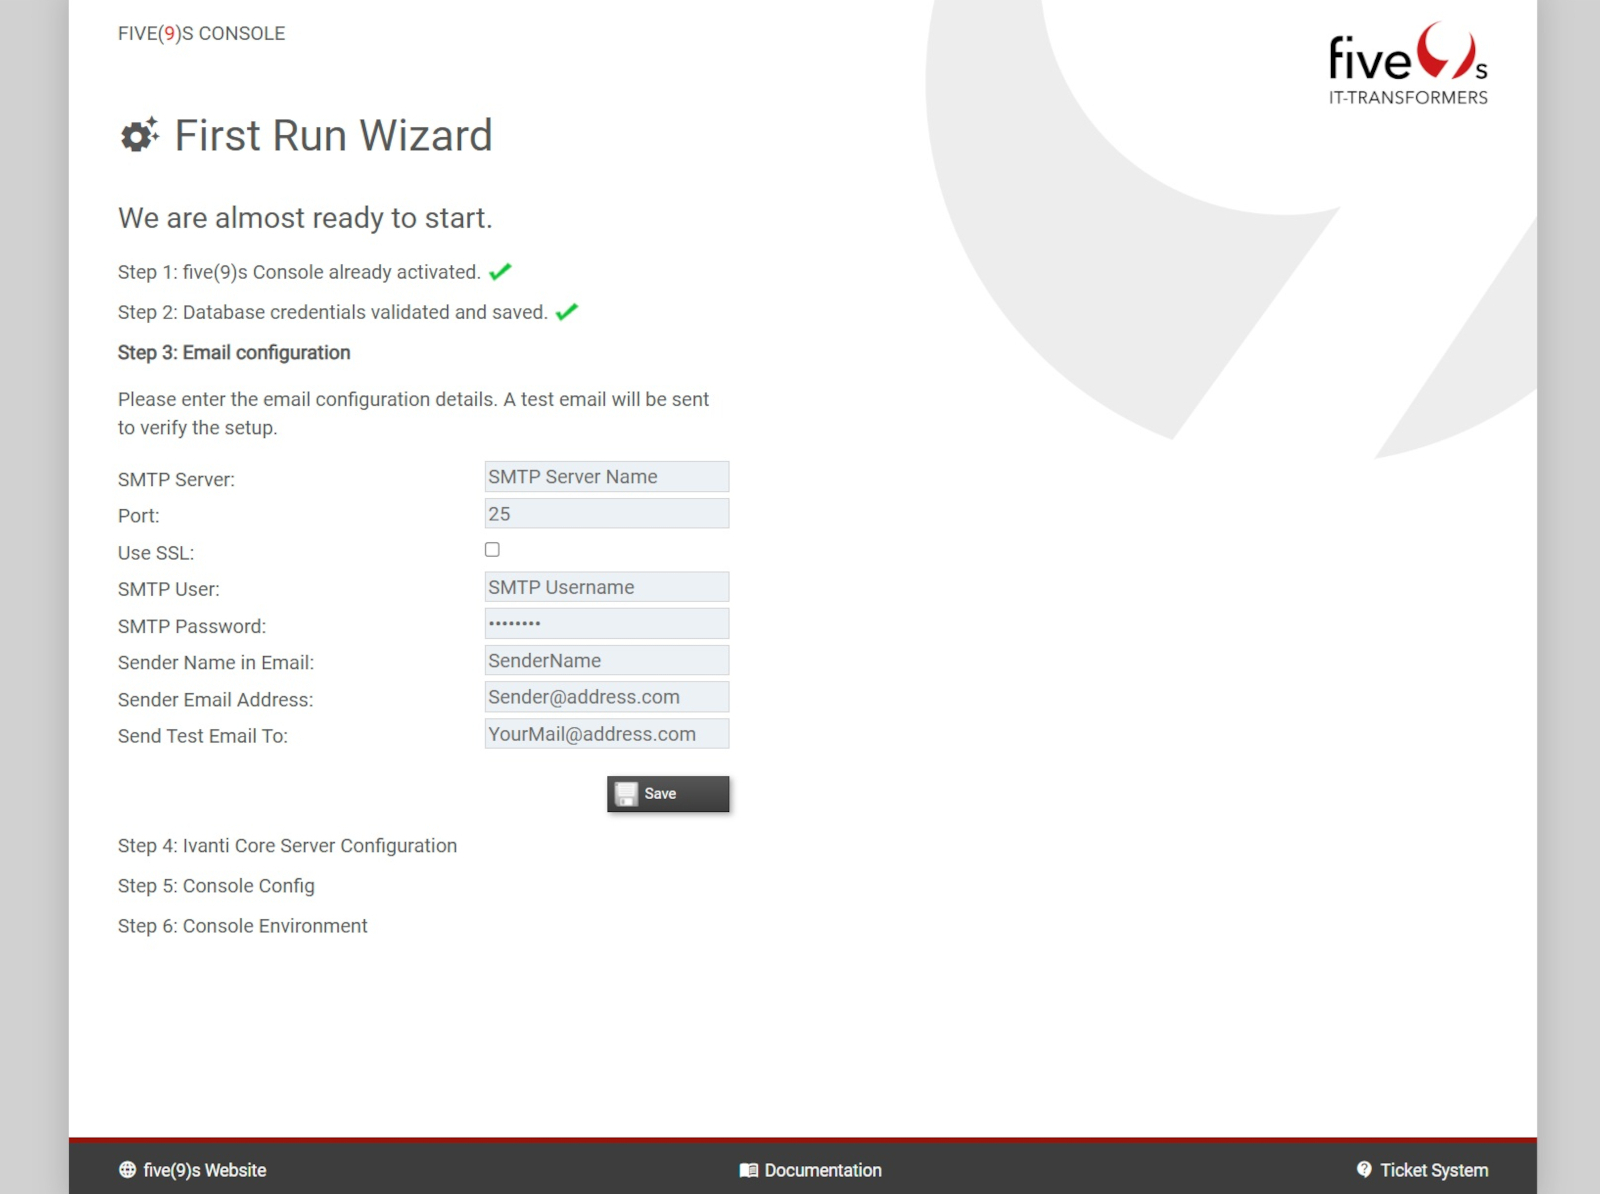
Step 3: As the five(9)s Console relies mainly on email to provide feedback to users, an SMTP connection is necessary. Please enter your SMTP Server Connection Settings and proceed with "Save".
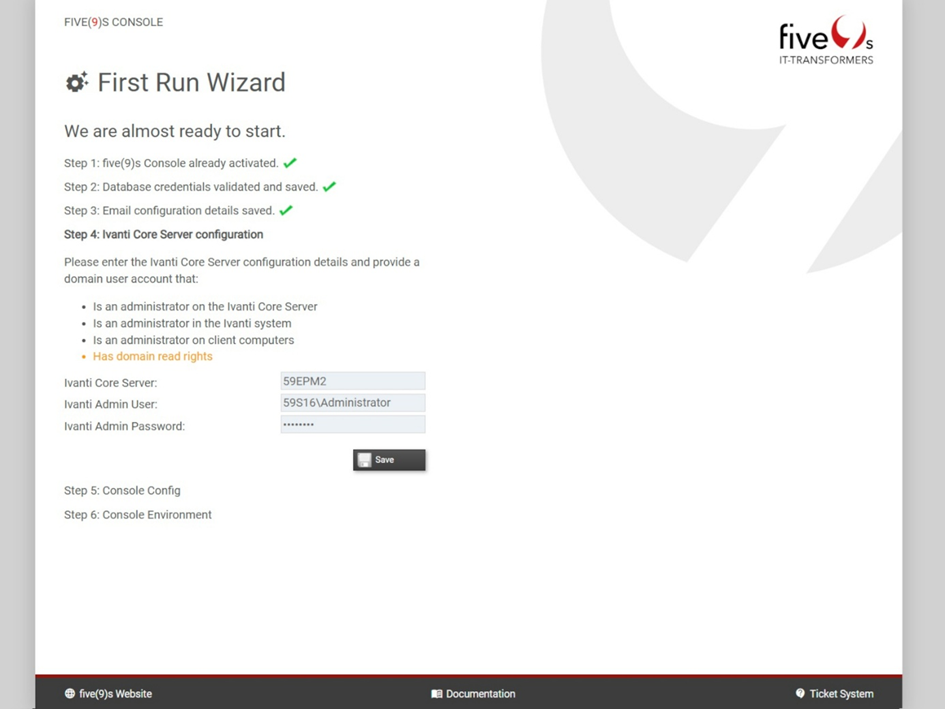
Step 4: The next screenshot shows how to configure the five(9)s Console to execute actions on your IVANTI Core Server.
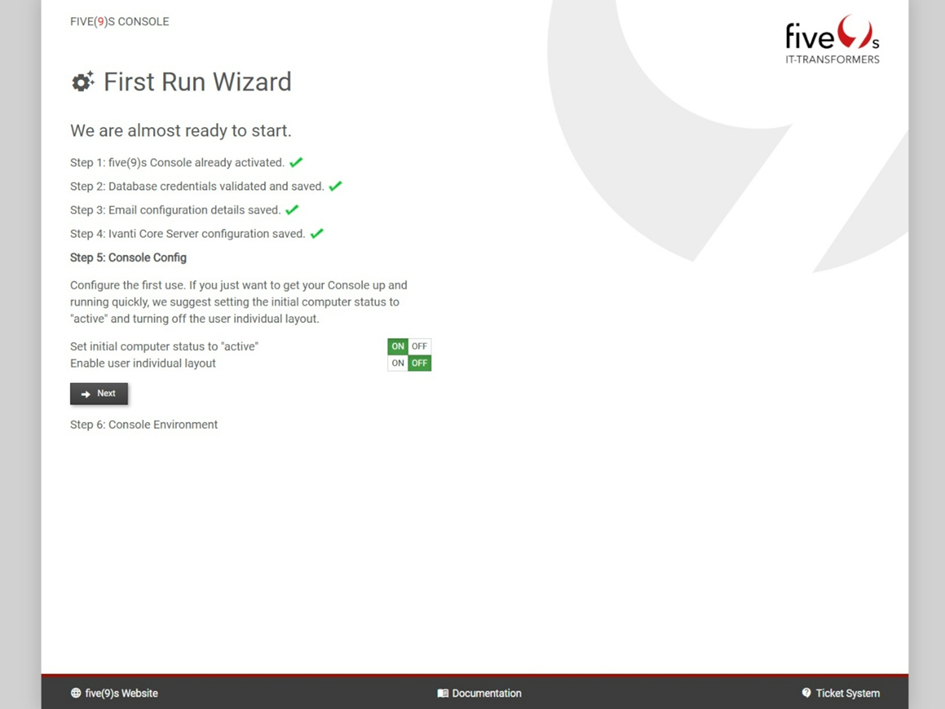
Step 5: On this screen, you can choose whether to set all computers in your EPM environment to the “Active” status. The five(9)s Console uses these statuses to display the current state of each client. Additionally, you can decide whether users can customize their Home button layout or if all users share one layout. Both the status values and the Home button layout settings can be modified later on the admin page. Click the “Next” button to continue.

You can change the console settings at any time by opening the five(9)s Console "Admin" tab.
To see the "Admin" tab you must be a five(9)s Console admin; the account used to run the installation is admin by default. To add more users to the console, please consult chapter 3.
"Adjusting Your IVANTI Installation" of this document.
To finalize the five(9)s Console installation and to use all of its features, you need to make some adjustments to your IVANTI installation. Please follow the steps explained in the next chapter.
3. Adjusting Settings in the IVANTI Endpoint Manager Console
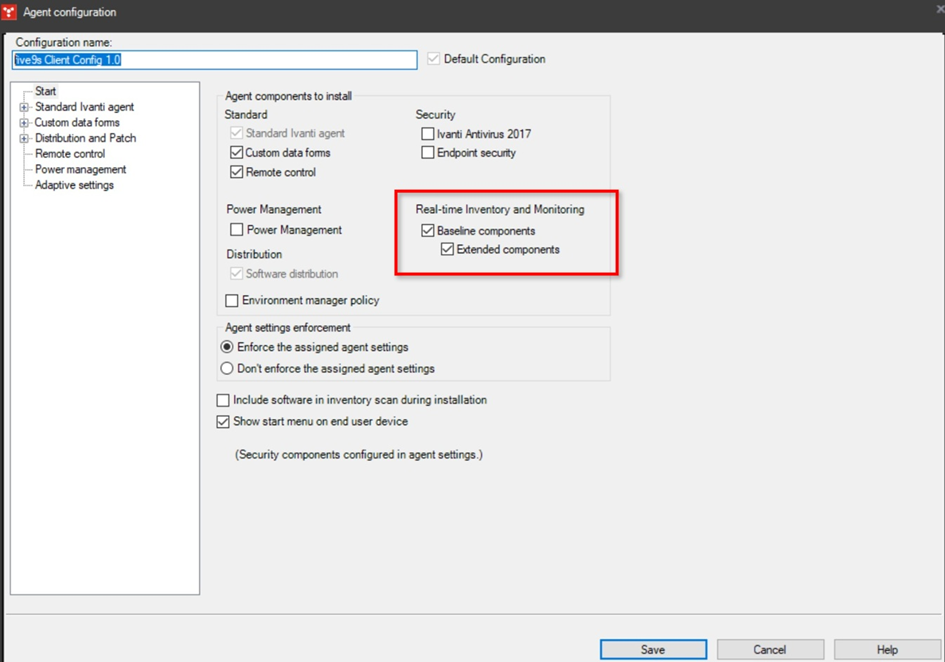
3.1 Setting Up the Agent Configurations for the five(9)s Console
To get started, change all agent configurations to have the real-time Inventory and monitoring components (both the baseline and the extended) included. These components are needed to enable real-time inventory features of your managed devices like showing services, event logs and processes out of the five(9)s Console.
3.2 Create an Explicit Scope for your Service Account
This step is required, because the Ivanti MBSDK needs to have an explicit Scope.
The “Default all machines” scope is not allowed for the MBSDK Service
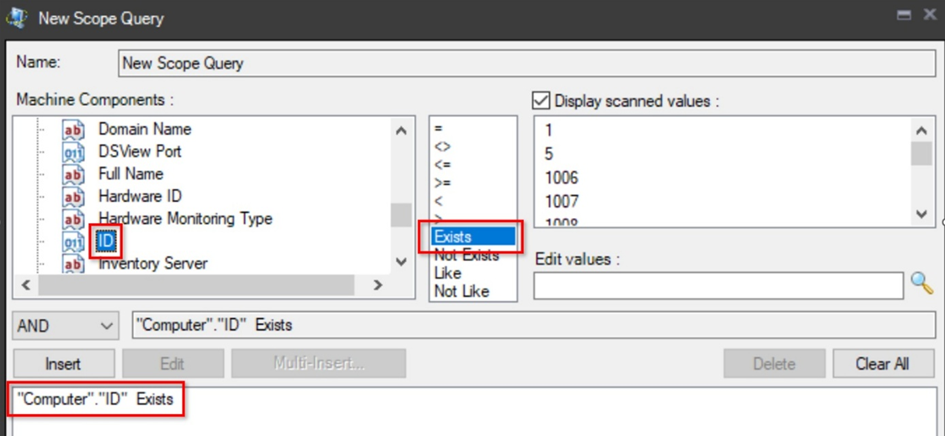
To create an explicit scope:
1. Open your Ivanti Management Console
2. Navigate to "User management"
3. Right click on Scopes and select "New Scope"

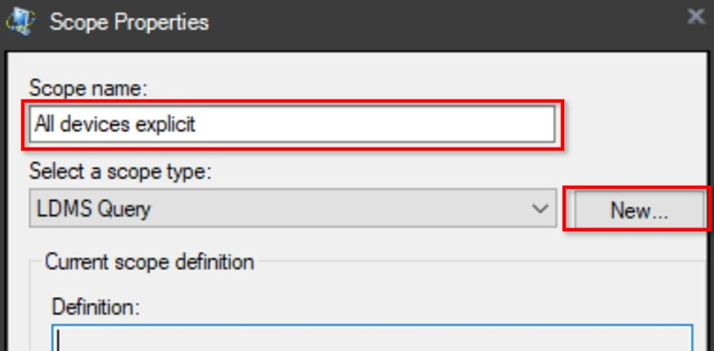
6. Go to the “User and Groups” folder, select your Ivanti service account used in the configuration “Step 4” of the console setup. Go to “properties” Select the Scopes and check the “All devices explicit” scope and click “OK”

3.1.3 Set up the Device Group for Patch-Management Piloting
If you plan to use the five(9)s Console to initiate the Patch Management process using the built-in procedure, please follow the steps below.:
The Console setup creates a computer group called “five9s Console Patch Pilot Group”. Add at least one device to this group, which can be found under <Devices/Public Devices> in the IVANTI Management Suite console’s network view.
TIP: All internal Console Processes can be extended by custom scripts.
4. Accessing the five(9)s Console
You can access the five(9)s Console on any machine with a supported browser (see chapter 1 / prerequisites) and a network connection to your IVANTI core server’s TCP port 80. Open: http://<YourCoreServer>/five9sConsole/.
Users must belong to the console group that matches their role. During installation, an admin group was created and populated with the installation user. The next chapter explains how to set up additional console users (e. g. for non-admins).
Most status information is sent via email. By default, emails go to the user’s AD address, so ensure it can receive messages. Users can also specify an override address in their console header later.
Depending on browser settings, logging in may require credentials from a five(9)s Console user account (see next chapter).
5. Adding Users to the five(9)s Console
- Ensure the new user is a domain user with a valid email address in your Active Directory (AD).
- Set up this user as IVANTI Management Suite Console user via IVANTI ’s AD connector (only if this is a new user to IVANTI).
- Make the new user a member of at least one IVANTI local security group on your core server (only if this is a new user to IVANTI)
- Open the five(9)s Console and navigate to the “Admin” module. Click on “Roles & Rights” and define a user role that represents all the rights a certain group of users should have within the five(9)s Console. These rights contain allowed menus (Home, Patch, OSD, SWD, SW Profiles, and so on), Custom Menus, Software Categories and buttons (also Custom Buttons) on the “Home” screen.


3. In the IVANTI Management Suite Console, assign a role to this user and a non-empty scope (only if this is a user that is new to IVANTI).
five(9)s Console users inherit the scope assignments from the IVANTI Management Suite Console.
5. Manage your Operating Systems
Click here
6. Configure Software Packages for Distribution
Click here
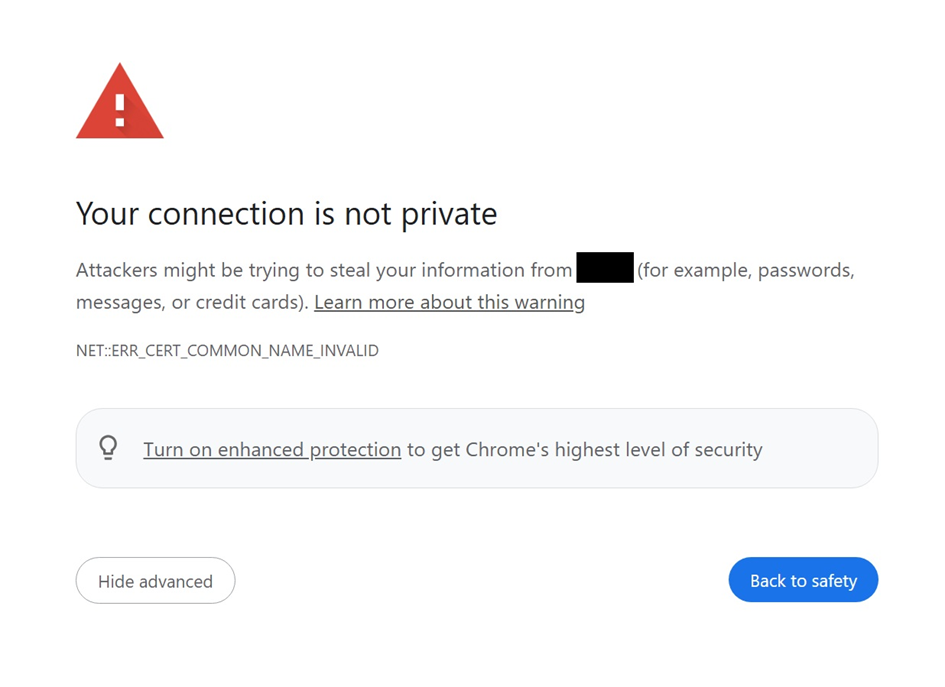
7. Access five(9)s Console using HTTPS
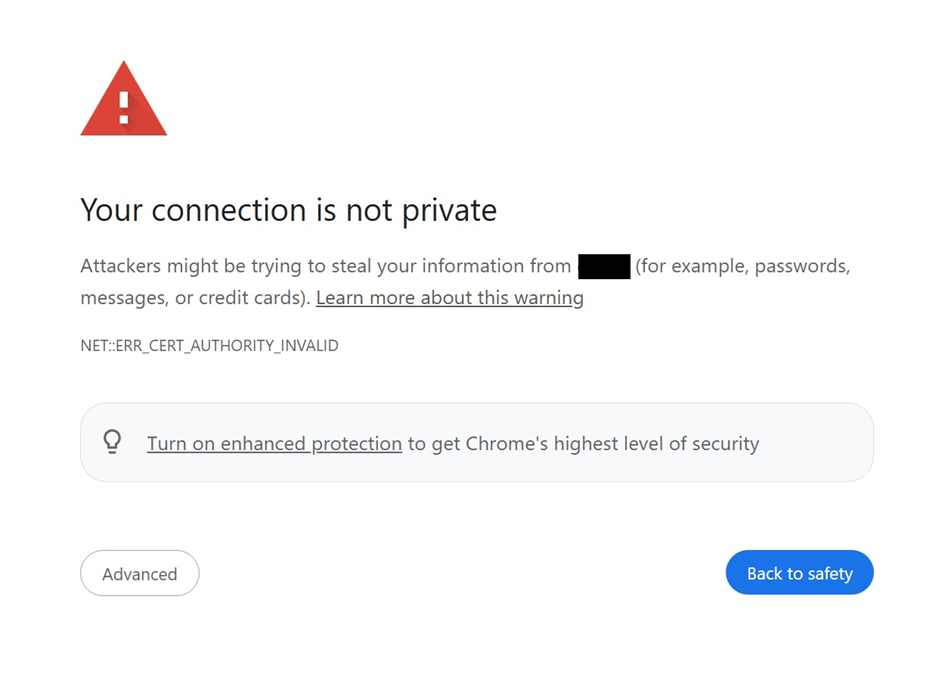
You can trust the self-signed certificate of the core server using one of the following methods:
A) Add it to your enterprise certificate store.
or
B) Distribute it to your machines and add it to the “Trusted Root Certification Authorities” via a script.
Follow these steps:


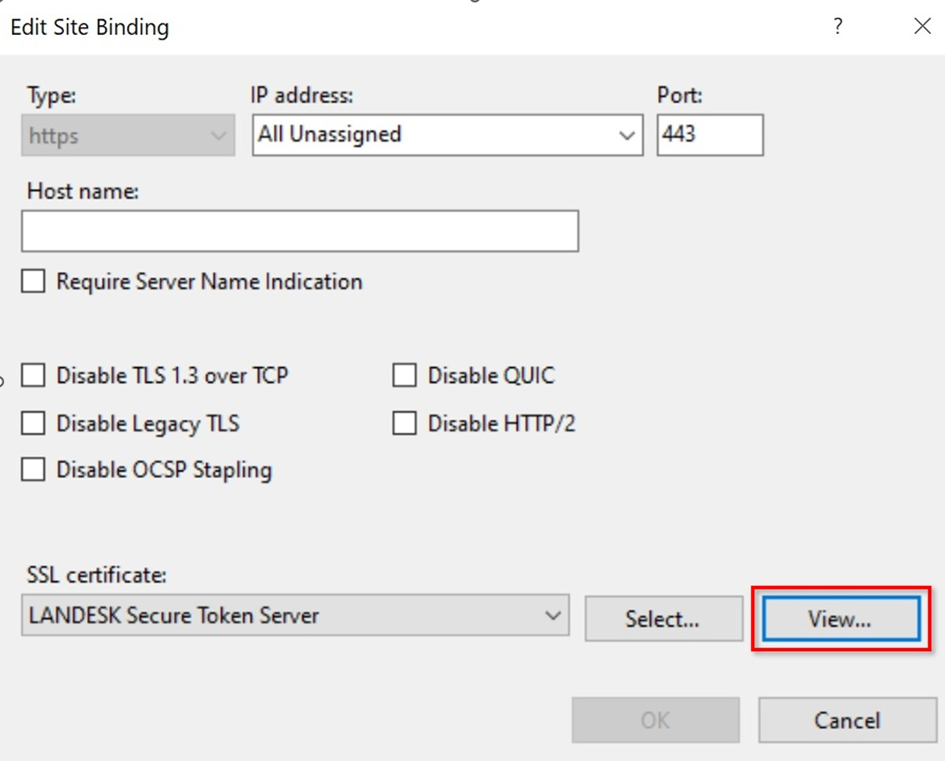

You can use this certificate using one of the two methods mentioned above.
8. FAQ

Q2: I am unable to use the <Ping>/<Wake Up>/<Trace Route>/<RDP> command.
A: Please ensure that the computer you are using to open the five(9)s Console has an active Ivanti agent.
Q3: Does the five(9)s Console write any log files?
A: Yes. You can find the log files on your Core Server in the following locations:
Installation Logs: C:\inetpub\wwwroot\five9sWS\logs
Process Logs: C:\Program Files (x86)\Desired State Manager\Logs
Q4: Policy Sync, Inventory Scan and Security Scan do not work for me.
A: Please check C:\inetpub\wwwroot\five9sWS\logsLog on your Core Server. If you see “error Access is denied. (Exception from HRESULT: 0x80070005 (E_ACCESSDENIED))” in the log file, the Core Server cannot connect with the client to initiate the above task. Open the client’s firewall on the client for incoming TCP traffic on the ports 135 and 49152-65535 from your Core Server.
Q5: I cannot see any clients in the five(9)s’ Console.
A: Ensure the Ivanti account you are using to log in to the five(9)s Console has a non-empty scope assigned.
Document information
Disclaimer